Showing posts with label Spearkrieg. Show all posts

Wednesday, 4 March 2015

Eastern Front Spearkrieg (Late '43)

Late 1943 and 94th (Saxon) Infantry Division are dug in expecting an onslaught. Through the snow, diesel engines are rumbling and tank tracks start to clank. A Soviet Tank Corps is on the move!
94th Infantry (L-R, Fran, Me)
The scenario pitted a significantly understrength German Infantry Division (Myself and Fran) against a nearly full strength Soviet Tank Corps (Alex, Ian and Jon) in late 1943. Snow was on the ground, the rivers were frozen so that all units could cross anyway barring Heavy Armour (e.g KV-1s). We used the Spearkrieg amalgamation rules (because they work) and the scenario (and bulk of the figures) was provided by Alex (and Pendraken).

94th Division was deployed with 2 Regiments up, 1 in reserve. (See Stalingrad TOE). The only hidden deployment was the hidden location of our limited anti-tank guns as well as the garrison strengths of the front line villages. We were promised that a Panzer Division would be sent to assist.
Soviet Initial Deployment (L-R, Ian, Jon, Alex)
The Soviets initially deployed 3 Tank Brigades, no subtlety involved, just try and overpower the German defenders.

Massed Soviet Armour
I'd like to say that my viewpoint was very focussed on the German right so I'm going to concentrate on the actions there - hopefully Ian, Jon or Fran can describe what happened on the left.

Initial Soviet Left Flank Assault Force
The surprisingly high Soviet Command Values led to rapid advances and early pressure appeared to be applied along the line. But in some ways the lack of Anti-Tank Guns an vehicles meant that actually the Soviets couldn't actually see there opponents whilst the German could call in Artillery, Mortars and Anti Infantry Guns with surprisingly good effects.
German 15.0cm Infantry Gun - Game Changer!
Around Turn 4 the line was still holding (still no Panzers) when a message was sent to Divisional HQ from OKW, Advance! (This is based on a Spearhead scenario and a historical event). At this point I remember Fran "bravely" ordering his Engineers to leave their trenches and flme the tanks in front of them - taking out a couple of platoons (but leaving themselves horrendously exposed).
A breach.
Finally the ongoing tank fire was to much for my 1st battalion and they retreated - abandoning their positions and leaving a hole in the lines - it would have been interesting if we'd have had a couple more turns to see if the Soviets could have exploited this. Instead the towns were assaulted again and again, and again and again and eventually despite throwing back multiple assaults, the engineers fell and Jons infantry was able ot seize the village.
The Village Falls.
All in all a great game and an interesting scenario, it just goers to show that combined arms works and if you fire enough of it, even tanks are susceptible. Thanks Alex.
Vietnamese Village
Other games included Bloodbowl, a Crusaders game (sorry don't know ruleset) and a Vietnam Force on Force Game.

Cheers JR

Monday, 21 January 2013

Stalingrad South – 15th Sept to 20th Sept 1942 - Spearkrieg Game

Refight - Stalingrad South – 15th Sept to 20th Sept 1942

Stalingrad.  We’ve all heard about it and maybe seen some films about it of dubious historical value but entertaining nevertheless.  So, apart from it being so well know, why refight it?  It’s just a slog through an urban Hell, right?

Well, in some ways it is but for both sides it is about nursing resources, organising complicated attacks in a difficult environment and more importantly, the Germans CAN win it but it is very tricky.  As a wargame player, one of the interested for me is in understand the problems WW2 commanders faced and recreating that on the tabletop.  I’ve done this in for Normandy and Kursk and now I wanted to try urban combat.

At the club, we use a mix of Spearhead and Blitzkrieg Commander (BKC), a hybrid of my own construction which we call Spearkrieg.  Spearhead provides the core but we use command rolls to trigger movement and firing and a different Recon system (see link for more on Spearkrieg).  We’ve found that, with a few considered tweaks, we can recreate massive battles/campaigns involving more than half a dozen Divisions that can be played quickly and give historical results.

For Stalingrad, we will be fighting three campaigns.  The first is in the south of the city, the second in the middle and the final one will be in the north around the main factories and set several weeks after the first two campaigns.  The main source for maps, information and the Divisional strengths/TOEs is from the quite frankly superb book, Armageddon in Stalingrad (volume 2) by David M. Glantz and Jonathan M. House.  Glantz is a excellent historian and produces academic texts full of all the stats and maps that we wargamers actually need.  They are a slog to read because of the detail but they are worth it for that detail, particularly for the Soviet side (e.g. division commander biographies are included and numbers men (by weapons) week by week for the divisions in Stalingrad).

This report covers the South battle around the part of the city that contains the much talked about the Grain Elevator.  The Germans are attacking with three Divisions: 24th Panzer Division, 29th Motorized Division and the 94th (Saxon) Infantry Division.  The Soviets have a mish-mash of units dug in around the city (see 10th Rifle Brigade, 35th Guards Infantry Division and 131st Infantry Division) but the hope of reinforcements 92nd Naval Rifle Brigade.

The map is based on a German military map I found on the web and seemed to match Soviet ones I found that weren’t as detailed.  I traced onto the map the Spearhead 3” sector squares, railway lines and deep gullies (see South Map).  The Germans had to set-up in the marked areas (or just off table) and the Soviets set-up, dug-in, anywhere 10” or more away from the Germans.
I’m not going to give a blow by blow account of the fighting but here are some maps and pictures showing the re-fight.

South map


Day 1
We forgot to take any photos but here’s the frontline.


The dice mark the front line (below it are the German positions) and to the left are Soviet infantry that are already known about (i.e. spotted) – there are more Soviets but they haven’t been spotted.
Day 2

The 94th (Saxon) Division infiltrate down the gully and attack the Canning Factory.


End of day 2 (dice mark frontline).  The 24th Pz Div have made good progress to the left of the picture.  94th Inf Div in the middle and right have pushed into the Canning Factory District but only have a toe-hold.  Of picture the 60th Mot Div are really struggling against the veteran SMG survivors of the 35th Guards.
Day 3

Soviet infiltration attack!  Day 3 (17th Sept) start with a soviet SMG company attack into the heart of the 24th Pz lines.  I guess those building weren’t as clear as the Germans thought.  Soviets have light grey helmets.

The sweep of the Day 3 battle.

The Day 3 survivors of 94th Div.
 
 Day 4


Doug Lowe, commander of Group Hellermann, 24th Panzer division finds that Dr Pepper is no cure for the Stalingrad Stare.  He wishes his Group from 24th Pz were being pulled out at the end of today as the rest of the division were historically.
Fighting around the Grain Elevator (middle bottom) and the 24th Pz almost clear left of the railway line but the 95th Naval Rifle Brigade has turned up (middle top)!
Looking north along the railway line.  The Grain Elevator and Station 2 are middle right.
 The Germans push on now the Elevator is captured.

Day 5


Only the 94th inf div and Group Hellerman of the 24th are left for the Germans to use to clear the last streets.  The other forces have been withdrawn to rest and be used in other areas of the theatre.

Day 6
 

The 94th inf div is left by Corps to clear the remaining buildings but it is too much to ask of this tired Division.  Here, Naval SMG platoons (left) hold Station 2 as the 94th attack from the right across the railway line.


Map showing the initial German Division positions and the frontline at the end of each day.  The result was a Soviet strategic victory because the Germans failed to clear all the sectors within the 6 days – but it was very close!


The butcher’s bill*:
Untitled Document

Soviet losses


Platoon

Starting no.

Lost

Percentage lost

Infantry

135

114

84.4

AFV

6

6

100

ATG

6

6

100

Other support

13

13

100

German losses


Platoon

Starting no.

Lost

Percentage lost

Infantry (24 Pz)

24

16

66.7

Infantry (29 Mot)

33

7

21.2

Infantry (94 Inf)

42

22

52.4

Total Infantry

99

45

45.5


Engineers (24 Pz)

19

9

47.3

Engineers (29 Mot)

10

4

40

Engineers (94 Inf)

8

2

25

Total Engineers

37

15

40.5


AFV (24 Pz)

7

2

28.6

AFV (29 Mot)

2

4

50

AFV (94 Inf)

2

1

50

Total AFV

11

5

45.5


Other support (24 Pz)

10

3

30

Other support (29 Mot)

17

2

11.8

Other support (94 Inf)

16

2

12.5

Total other support

43

7

16.3


Sniper losses

German

Soviet

Regt HQ

2

0

Batt HQ

2

1

FOO

1

0

FAC

1

0


*Note: Soviet units could not break as per Spearhead rules but a platoon that was “killed” could only roll for recovery (on a 6) at the end of the day it was killed – failure meant it was lost for good.  The German units could break and be lost for the battle but their killed platoons could roll for recovery at the end of each day.  Resting German battalions for a day or two to recover was the sensible option!

TOE for German 94th Infantry Division at Stalingrad

This is a TOE for the Spierkrieg Stalingrad campaign

94th Infantry Division     (Saxon)                Supply Points:

267th Infantry Regiment
HQ:
HQ stand (Cmd: 10)
Recon:
SMG Motorcycle
Engineers:
1 x Engineer Stands  (Flame)
Hvy support:
1 x 150mm + truck

1st Battalion (Regular)
HQ:
HQ stand (Cmd: 9)
2 x HMG
1 x 81mm mortar + truck
1 x StuG IIID
1st Comp:
3 x Rifle Stands
2nd Comp:
3 x Rifle Stands

2nd Battalion (Regular)
HQ:
HQ stand (Cmd: 9)
2 x HMG
1 x 81mm mortar + truck
1st Comp:
3 x Rifle Stands
2nd Comp:
3 x Rifle Stands

3rd Battalion (Regular)
HQ:
HQ stand (Cmd: 9)
2 x HMG
1 x 81mm mortar + truck
1st Comp:
3 x Rifle Stands 
2nd Comp:
3 x Rifle Stands 

274th Infantry Regiment
HQ:
HQ stand (Cmd: 10)
Recon:
SMG Motorcycle
Engineers:
1 x Engineer Stands  (Flame)
Hvy support:
1 x 150mm + truck

1st Battalion (Regular)
HQ:
HQ stand (Cmd: 9)
2 x HMG
1 x 81mm mortar + truck
1 x StuG IIID
1st Comp:
3 x Rifle Stands
2nd Comp:
3 x Rifle Stands

2nd Battalion (Regular)
HQ:
HQ stand (Cmd: 9)
2 x HMG
1 x 81mm mortar + truck
1st Comp:
3 x Rifle Stands
2nd Comp:
3 x Rifle Stands

29th Pioneer Abteilung
HQ:
HQ stand (Cmd: 9) (Regular)
1st Comp:
3 x Engineer Stands (Flame)
3rd Comp:
2 x Engineer Stands (Flame)

276th Infantry Regiment
HQ:
HQ stand (Cmd: 10)
Recon:
SMG Motorcycle
Engineers:
1 x Engineer Stands  (Flame)
Hvy support:
1 x 150mm + truck

1st Battalion (Regular)
HQ:
HQ stand (Cmd: 9)
2 x HMG
1 x 81mm mortar + truck
1st Comp:
3 x Rifle Stands
2nd Comp:
3 x Rifle Stands

2nd Battalion (Regular)

HQ: HQ stand (Cmd: 9)
2 x HMG
1 x 81mm mortar + truck
1st Comp:
3 x Rifle Stands
2nd Comp:
3 x Rifle Stands

94th Artillery Regiment      
No. Daily Fire Missions Available
FOO:
3 x FOO (Cmd: 8)
1st Battalion
3 x 10⁵/28mm Howitzers □ □ □
2nd Battalion
3 x 10⁵/28mm Howitzers □ □ □
3rd Battalion
3 x 150/30mm Howitzers □ □ □

TOE for German 29th Motorised Division at Stalingrad

This is a TOE for the Spierkrieg Stalingrad campaign

29th Motorized Division  (Falcon Division)                Supply Points:

15th Infantry Regiment (Motorised)
HQ:
HQ stand (Cmd: 10)
Recon:
SMG Motorcycle
Engineers:
1 x Engineer Stands  (Flame)
Hvy support:
1 x 150mm + truck

1st Battalion (Veteran)
HQ:
HQ stand (Cmd: 9)
2 x HMG
1 x 81mm mortar + truck
1 x StuG IIID
1st Comp:
3 x Rifle Stands + trucks
2nd Comp:
3 x Rifle Stands + trucks

2nd Battalion (Regular)
HQ:
HQ stand (Cmd: 9)
2 x HMG
1 x 81mm mortar + truck
1st Comp:
3 x Rifle Stands + trucks
2nd Comp:
3 x Rifle Stands + trucks

3rd Battalion (Regular)

HQ:
HQ stand (Cmd: 9)
1 x HMG
1 x 81mm mortar + truck
1st Comp:
3 x Rifle Stands  + trucks
2nd Comp:
2 x Rifle Stands  + trucks

29th Pioneer Abteilung
HQ:
HQ stand (Cmd: 9) (Regular)
1st Comp:
3 x Engineer Stands (Flame) + trucks
1st Comp:
3 x Engineer Stands (Flame) + trucks
3rd Comp:
2 x Engineer Stands (Flame) + trucks

29th Panzer Abteilung
HQ:
Pz IIIG (Cmd: 9)

Panzer Battalion (Regular)
Ad Hoc Company:
1 x Pz IIIL, 1 x Pz IVF2

29th Artillery Regiment      
No. Daily Fire Missions Available
FOO:
3 x FOO (Cmd: 8)
1st Battalion
3 x 10⁵/28mm Howitzers □ □ □
2nd Battalion
3 x 10⁵/28mm Howitzers □ □ □
3rd Battalion
3 x 150/30mm Howitzers □ □ □   

71st Infantry Regiment (Motorised)
HQ:
HQ stand (Cmd: 10)
Recon:
SMG Motorcycle
Engineers:
1 x Engineer Stands  (Flame)
Hvy support:
1 x 150mm + truck

1st Battalion (Veteran)
HQ:
HQ stand (Cmd: 9)
2 x HMG
1 x 81mm mortar + truck
1 x StuG IIID
1st Comp:
3 x Rifle Stands + trucks
2nd Comp:
3 x Rifle Stands + trucks

2nd Battalion (Regular)
HQ:
HQ stand (Cmd: 9)
1 x HMG
1 x 81mm mortar + truck
1st Comp:
3 x Rifle Stands  + trucks
2nd Comp:
2 x Rifle Stands  + trucks

3rd Battalion (Regular)
HQ:
HQ stand (Cmd: 9)
1 x HMG
1 x 81mm mortar + truck
1st Comp:
3 x Rifle Stands  + trucks
2nd Comp:
2 x Rifle Stands  + trucks

The commander of the 29th Motorized Division has a personal goal, which, should it be achieved, means he can claim a personal victory regardless of any other result for the rest of the German forces involved.  He must end the battle with his panzer battalion unbroken and at its current strength.

TOE for German 24th Panzer Division at Stalingrad


This is a TOE for the SpierKrieg Stalingrad campaign

24th Panzer Division     (Leaping Horseman)            Supply Points:

Group Edelstein
HQ:
Pz IIIG (Cmd: 10)
Recon:
Pz IIF

Panzer Battalion (Veteran)
Recon: Pz IIF
Ad Hoc Company:
1 x Pz IIIN, 1 x Pz IIIL, 1 x Pz IVF2, 2 x Marder III

26th PanzerGrenadier Regiment
HQ:
HQ stand (Cmd: 10)
Recon:
SMG Motorcycle
Engineers:
3 x Engineer Stands  (Flame)
Hvy support:
1 x 150mm SPG
FLAK:
Zkgw 1 (20mm Flak SPG)

1st Battalion (Regular)
HQ:
HQ stand (Cmd: 9)
1 x 81mm mortar + truck
1 x StuG IIID
1st Comp:
3 x Rifle Stands + trucks
2nd Comp:
2 x Rifle Stands + trucks
3rd Comp:
2 x Rifle Stands + trucks

2nd Battalion (Veteran)
HQ:
HQ stand (Cmd: 9)
1 x 81mm mortar + truck
1 x Werfer (Rocket) 251 Hanomag
1st Comp:
3 x Rifle Stands + 251 Hanomag
2nd Comp:
2 x Rifle Stands + 251 Hanomag
3rd Comp:
2 x Rifle Stands + 251 Hanomag

3rd Battalion (Regular)
(attached from 21st PzGren Regt)
HQ:
HQ stand (Cmd: 9)
1 x 81mm mortar + truck
1st Comp:
3 x Rifle Stands + trucks
2nd Comp:
2 x Rifle Stands + trucks
3rd Comp:
2 x Rifle Stands + trucks

40th Pioneer Abteilung
HQ:
HQ stand (Cmd: 9) (Veteran)
1st Comp:
3 x Engineer Stands (Flame)
3rd Comp:
3 x Engineer Stands (Flame)

89th Panzer Artillery Regiment      
No. Daily Fire Missions Available
FOO:
3 x FOO (Cmd: 8)
1st Battalion  
3 x 10⁵/28mm Howitzers
2nd Battalion:  
3 x 10⁵/28mm Howitzers
3rd Battalion:   
3 x 150/30mm Howitzers   

Group Hellermann

21st PanzerGrenadier Regiment
HQ:
HQ stand (Cmd: 10)
Recon:
SMG Motorcycle
Engineers:
3x Engineer Stands  (Flame)
Hvy support:
1 x 150mm SPG
FLAK:
Zkgw 1 (20mm Flak SPG)

1st Battalion (Veteran)
HQ:
HQ stand (Cmd: 9)
1 x 81mm mortar + truck
1 x 88L56 Gun + Truck
1 x Marder III
1st Comp:
3 x Rifle Stands + trucks
2nd Comp:
2 x Rifle Stands + trucks
3rd Comp:
2 x Rifle Stands + trucks

635th Pioneer Abteilung
HQ:
HQ stand (Cmd: 9) (Regular)
1st Comp:
3 x Engineer Stands (Flame) + trucks
2nd Comp:
3 x Engineer Stands (Flame) + trucks
The commander of the 24th Panzer has a personal goal, which, should it be achieved, means he can claim a personal victory regardless of any other result for the rest of the German forces involved.  The 24th Panzer must secure (no Soviet units within 6”) the northern most Rail bridge to the left by the end of 16th Sept (day 2, Turn 9).

TOE for Russian 131st Rifle Division at Stalingrad

This an Order of Battle for the Spearkrieg Stalingrad Campaign

131st Rifle Division 

593rd Regiment
HQ stand (Cmd: 8)
3 x SMG Stands (Veteran)
1 x 81mm mortar

1st Battalion (Regular)
HQ: HQ stand (Cmd: 7)
1st Comp: 3 x Rifle Stands □ □ □
2nd Comp: 3 x Rifle Stands □ □ □

2nd Battalion (Green)
HQ: HQ stand (Cmd: 7)
1st Comp: 3 x Rifle Stands □ □ □
2nd Comp: 3 x Rifle Stands □ □ □

3rd Battalion (Green)
HQ: HQ stand (Cmd: 7)
1st Comp: 3 x Rifle Stands □ □ □
2nd Comp: 3 x Rifle Stands □ □ □

695th Regiment
HQ stand (Cmd: 8)
3 x SMG Stands (Veteran)
1 x 81mm mortar

1st Battalion (Regular)
HQ: HQ stand (Cmd: 7)
1st Comp: 3 x Rifle Stands □ □ □
2nd Comp: 3 x Rifle Stands □ □ □

2nd Battalion (Green)
HQ: HQ stand (Cmd: 7)
1st Comp: 3 x Rifle Stands □ □ □
2nd Comp: 3 x Rifle Stands □ □ □

3rd Battalion (Green)
HQ: HQ stand (Cmd: 7)
1st Comp: 3 x Rifle Stands □ □ □
2nd Comp: 3 x Rifle Stands □ □ □

743rd Regiment
HQ stand (Cmd: 8)
  
1st Battalion (Regular)
HQ: HQ stand (Cmd: 7)
1st Comp: 3 x Rifle Stands □ □ □
2nd Comp: 3 x Rifle Stands □ □ □

2nd Battalion (Green)
HQ: HQ stand (Cmd: 7)
1st Comp: 3 x Rifle Stands □ □ □
2nd Comp: 3 x Rifle Stands □ □ □

3rd Battalion (Green)
HQ: HQ stand (Cmd: 7)
1st Comp: 3 x Rifle Stands □ □ □
2nd Comp: 3 x Rifle Stands □ □ □

Artillery Reg        No. Daily Fire Missions Available
FOO: 1 x FOO (Cmd: 6)
1st Battalion: 3 x 122/22mm Howitzer □

TOE for Russian 95th Naval Rifle Brigade at Stalingrad

This an Order of Battle for the Spearkrieg Stalingrad Campaign

95th Naval Rifle Brigade  (From 17 September)

HQ stand (Cmd: 8)
2 x 81mm mortar
2 x 120mm mortar
3 x SMG (Veteran)


1st Battalion (Veteran)
HQ: HQ stand (Cmd: 8)
1st Comp: 3 x Rifle Stands
2nd Comp: 3 x Rifle Stands
3rd Comp: 3 x Rifle Stands

2nd Battalion (Regular)

HQ: HQ stand (Cmd: 7)
1st Comp: 3 x Rifle Stands
2nd Comp: 3 x Rifle Stands
3rd Comp: 3 x Rifle Stands


3rd Battalion (Regular)
HQ: HQ stand (Cmd: 7)
1st Comp: 3 x Rifle Stands
2nd Comp: 3 x Rifle Stands
3rd Comp: 3 x Rifle Stands


4th Battalion (Regular)
HQ: HQ stand (Cmd: 7)
1st Comp: 3 x Rifle Stands
2nd Comp: 3 x Rifle Stands
3rd Comp: 3 x Rifle Stands


AT Battalion (Regular)
HQ: HQ stand (Cmd: 7)
3 x 45mm AT gun


Artillery Reg    No. Daily Fire Missions Available
FOO: 1 x FOO (Cmd: 6)
1st Battalion
2 x 76/41mm Howitzers □ □

TOE for Russian 35th Guards Rifle Division at Stalingrad

This an Order of Battle for the Spearkrieg Stalingrad Campaign

35th Guards Rifle Division

100th Regiment
HQ stand (Cmd: 9), 3 x SMG stands (Veteran)
1st Battalion (Veteran)
HQ: HQ stand (Cmd: 8)

1st Comp: 3 x Rifle Stands □ □ □

101st RegimentHQ stand (Cmd: 9), 1 x 45/46 ATG

1st Battalion (Veteran)
H
Q: HQ stand (Cmd: 8)
1st Comp: 3 x Rifle Stands □ □ □ 102nd RegimentHQ stand (Cmd: 9)
1st Battalion (Veteran)HQ: HQ stand (Cmd: 8)
1st Comp: 3 x Rifle Stands □ □ □
10th Tank Destroyer Brigade (Cmd: 7)
1 x 45/46 ATG
 1 x 76mm AT gun
 1 x T-34c
 1 x T-70

Artillery Reg        No. Daily Fire Missions Available
FOO: 2 x FOO (Cmd: 6)

1st Battalion
3 x 122/22mm Howitzer

3rd Battalion
2 x BM-8 Katyushas □ □ (2 zone template; attack values as Neberwerfer: AT=3, AI=6)

TOE for Russian 10th Rifle Brigade at Stalingrad

This an Order of Battle for the  Spearkrieg Stalingrad Campaign

10th Rifle Brigade  + others

HQ stand (Cmd: 8)

1st Battalion (Regular)

  • HQ: HQ stand (Cmd: 7) , 2 x HMG1 x 81mm mortar
  • 1st Comp: 3 x Rifle Stands
  • 2nd Comp: 3 x Rifle Stands
  • 3rd Comp: 3 x Rifle Stands

2nd Battalion (Green)

  • HQ: HQ stand (Cmd: 7), 2 x HMG, 1 x 81mm mortar
  • 1st Comp: 3 x Rifle Stands
  • 2nd Comp: 3 x Rifle Stands

3rd Battalion (Green)

  • HQ: HQ stand (Cmd: 7), 2 x HMG, 1 x 81mm mortar
  • 1st Comp: 3 x Rifle Stands
  • 2nd Comp: 3 x Rifle Stands

Artillery Reg         No. Daily Fire Missions Available                           

FOO: 1 x FOO (Cmd: 6)
  • 1st Battalion: 2 x 76/41mm Howitzers □ □ ; 1 x 122/22mm Howitzer □

271 NKVD Regiment

HQ stand (Cmd: 8), 1 x 81mm mortar
  • 1st Battalion (Regular): 1 x HMG
  • 1st Comp: 3 x Rifle Stands

133 Tank Brigade

HQ stand (Cmd: 8)
4 x KV1c

Wednesday, 5 December 2012

Somewhere in the Ardennes

With the weather getting colder I thought it was time for some snow on the ground. So I threw together a quick semi-historical Ardennes game. Turnout wasn't massive so it was just myself and Fran for this one.

SOMEWHERE IN THE ARDENNES - DECEMBER 1944

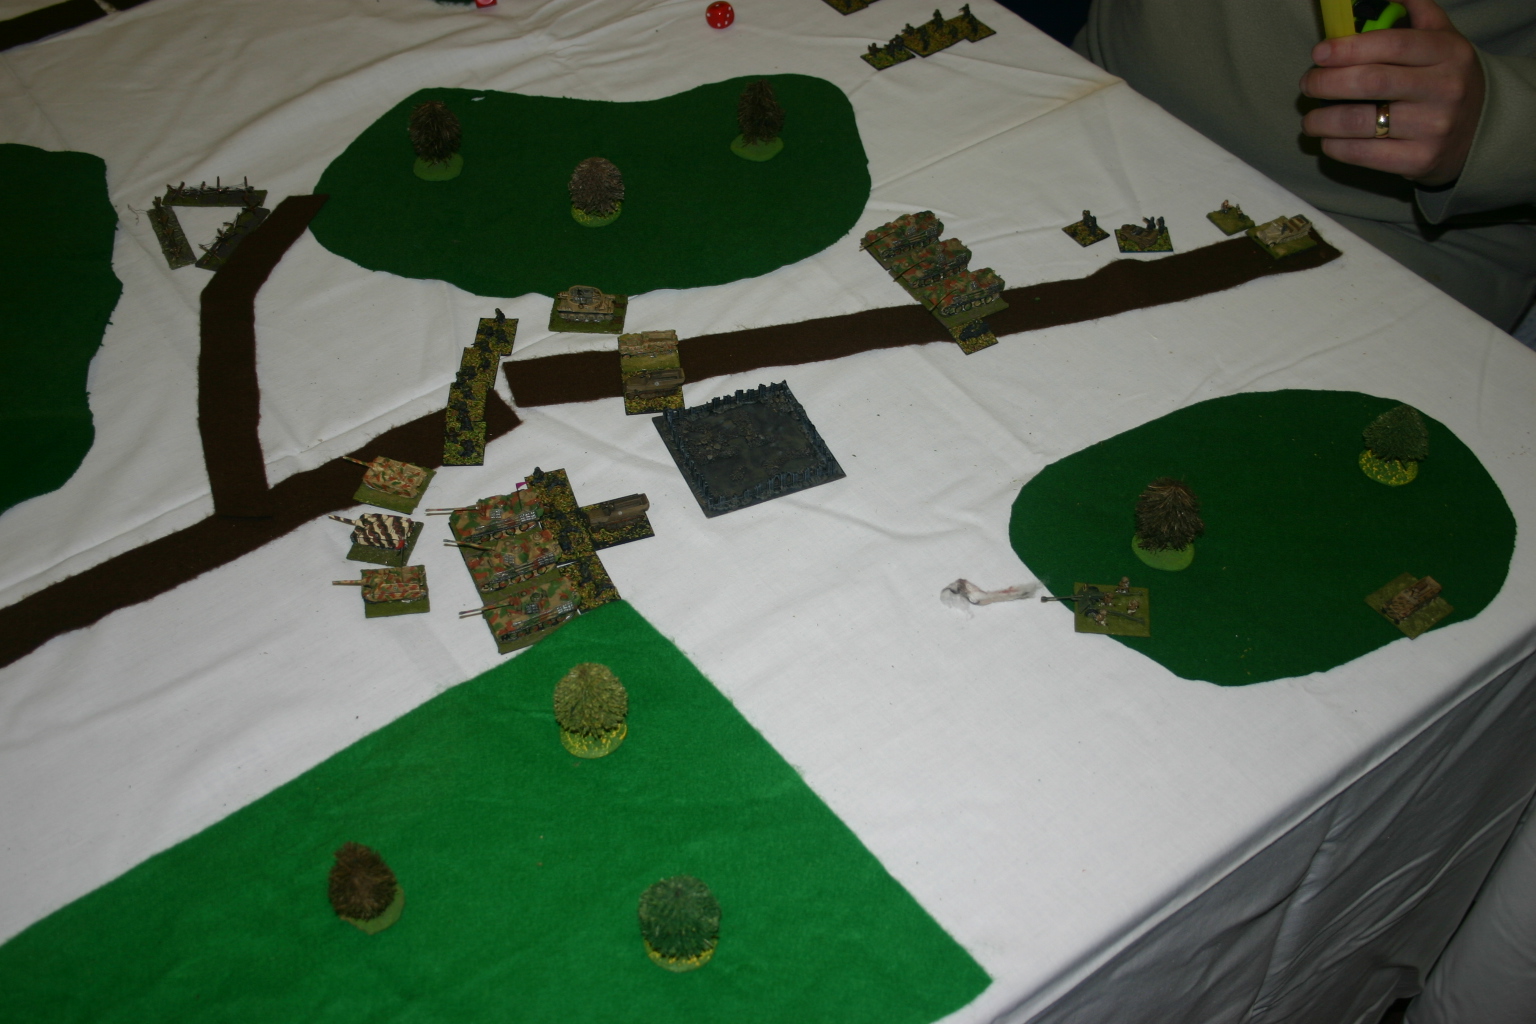
Table - Fran is attacking from Right to Left. Fallschirmjagers to North, Panzers to South
A massive surprise armoured attack has wrenched a hole in the American lines and a combat command has been dispatched to delay the German Vanguard made up of 2 Kampfgruppes.

ORBATS

Germans

Kampfgruppe Schmeiller
Regimental HQ: CO (CV10), 2 x 12cm Mortars, 2 x StuG III
Pioneer Battalion (Veteran): HQ (CV9), 3 x Pioneers (F/Throwers), 6 x Engineers
Jager Battalion (Regular): HQ (CV8), 9 x Infantry, 1 x 15cm IG, 1 x 8cm Mortar
Jager Battalion (Regular): HQ (CV8), 9 x Infantry

 Kampfgruppe von Rueiller
Regimental HQ: CO (CV10), Recce MC, Grille, 3 x JagdPanzer IVL
Mixed Battalion (Veteran): HQ (CV9), 3 x Panthers, 6 x Grenadiers, SP Mortar, Pioneer

Americans

Combat Command HQ: CO (CV10), 1 x Recce MC
Tank Battalion (Veteran): HQ (CV9), Stuart Recce, 4 x M4/74, 2 x M4/76, 2 x M10, 2 x M4/105 
Infantry Battalion (Veteran): HQ (CV9), 9 x Infantry, 2 x 57mm ATG, 1 x 81mm Mortar
Artillery: 2 x M7 Priest Battalions, 1 x 155mm Battery, 3 x FOO (CV8)

OBJECTIVES

Germans get a point for every fuel dump they capture intact, 0 points if dump is destroyed, Americans 1 point if evacuated or held. A point for each bridge held and a point for each enemy battalion broken.

The americans have three stands of engineers to destroy or evac the fuel. It takes 2 turns to prep for demolition and 5 to evac.

Past the last road before the river, the snow is thicker and movement off road is reduced by a third.

THE GAME

Didn't get full notes . . . woops . . . but will give it a go with what I got/remembered/make up. I could only deploy one infantry battalion on table at the start and had access to one Priest battalion at until Fran got past the first fuel dump.

The Panzers advanced steadily and drove straight around the first village avoiding my ATG which would have got a shot in the rear. A self propelled mortar was less lucky. With a combined assault with the Paras - whose battalion commanders were leaving the job up to the Regimental HQ - the first dump was taken moments before I destroyed it.

I could have accepted this if my artillery came in at all. One of the few times it did come in it landed on my own positions :(

As both flanks advanced I unleashed a few ambushes but awful rolling led to me only destroying one Panther (a second was destroyed when it blundered into a minefield.

Eventually my tank battalion deployed and the 1st company blew away a company of Fallschirmjager. Unfortunately poor fire then failed to take out the supporting StuG IIIs who proceeded to destroy them in return.

Up until the last turn it genuinely looked in the balance, the attrition had led to one of the jager battalions to break compensating for my 1st battalion and I successfully evacuated the second fuel depot on the Panzer flank. But some successful assaults and my artillery continuing to fail to come in led to 2 more depots falling as well as both bridges.

All in all the game worked well, Fran played the game to the scenario and really did his best to drive his forces on. Both sides had appalling dice and both German Regimental COs were very busy (not helped by the Panzers Recce driving into a minefield).


A few other games were played, couple of first round bloodbowl games, a Dystopian game between French and Covenant of Antarctica and a boardgame.
But I'll let others talk about that as I have no idea what happened.